We can perform CRUD operations using ADF 11g.
Many times the requirement comes as to have a User Interface to perform Insert, Update, Delete, Undo operations. We can meet this requirement using ADF.
This sample provides a solution to create a UI which provides a read-only database table and we can perform data editing through inline popup using ADF11g.
The IDE used in this project is Jdeveloper 11.1.1.xx3
I have created a table in a database.
Below is the syntax of the table:
And i inserted some rows in the database table as:
INSERT INTO BikesCompanies VALUES (001,'Hero Honda');
INSERT INTO BikesCompanies VALUES (002,'Bajaj Auto');
INSERT INTO BikesCompanies VALUES (003,'TVS Motors');
INSERT INTO BikesCompanies VALUES (004,'Yamaha Motor');
INSERT INTO BikesCompanies VALUES (005,'Royal Enfield');
INSERT INTO BikesCompanies VALUES (006,'LML India');
INSERT INTO BikesCompanies VALUES (007,'Suzuki Motors');
So my database table looks like:
Now in this project we will create a UI through ADF11g to perform Insert"," Edit"," Delete"," Save" and "Undo" Operations.
Here are some result screens which will describe the requirement more clearly:
When we will run the project, the result page will look like the below screen shot:
This shows our Database Table with the values which we inserted and five Buttons at the Top as "Insert"," Edit"," Delete"," Save" and "Undo". Let's first test Edit functionality.
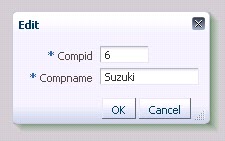
Here i have selected the 6th row and clicked the "Edit" button, a popup opens with the values populated as per the selected row.
We will change the company name to "Suzuki".
When we will press OK button the data will be saved in the Database and it will return to the main page. the changes will reflect in the main page.
Now we will test the Insert functionality. when we press "Insert button" a popup opens with balnk inputs.
when we enter values and press OK button, a new row gets created an data gets saved in the database.
Delete button will delete the selected row and Undo button will revert the last operation.
Here one thing is to be noted that when we perform Delete or Undo operation Data did not gets Saved into the Database. only after pressing Save button Commit operation takes place.
So in main page, to commit our changes we need to use Save button. but in the Popup commit operation takes place on pressing OK button.
Steps to be followed to create a UI for performing Insert, Update, Delete, Undo operation on a Database table.
1.) Creating New Application:
Click on New and choose Applications-> Fusion Web Application(ADF)
I gave the name for this project as SampleTableOpr.
Create a Model and View projects by pressing Next button & rename then project name and package name as per requirement.
The final project will look like this:
2.) Creating Database Connection
· Database connection can be created through several ways.
Go to Connection Navigator Tab (if not showing then click view-> Database-> Database Navigator).There we can create New IDE connection once and can use this connection by directly dragging into our project.
· When we create our project a overview window appears there by clicking on the second option “Connect to Database” leads us to the same Database connection page.
Here I am using the second option, i.e. through overview window.
Enter the following details in the Create Database Connection Window
Connection Name : HR (can choose any name for your convenience)
Connection Type : Oracle (JDBC)
Username : hr (name of the schema)
Password : ** (password of the schema)
Role : Normal
Driver : thin
Host Name : xyz (host name of the server)
JDBC Port : 1521 (port number)
SID : DB (SID of the Database)
3.) Creating Entity object, View object & Application Module:
Right click on Model folder and click New, this will lead to the following window.
Choose Entity Object from ADF Business components.
Select the Database & Schema.
Give name of the Entity Object & the name of the package for this object.
It creates a package if it does not exists.
Click on the Browse button for Schema Object.
Click on Query button. This will fetch all the tables present in that schema.
We need to select the table corresponding to our Entity Object.
Here we are going to operate on the BIKESCOMPANIES table created by us earlier, so I have selected that table. Click Next on the Attributes & Attribute Settings page.
On JAVA page we will not select Generating Java classes as in this project we don’t require to modify JAVA classes. Click Finish.
This will generate an Entity Object inside the package defined by us.
The next step is to create View Object.
Right click on the Model folder in Application Navigator and select New.
Click on ADF Business Components and select View Object.
Give the name of the View Object and the Package Name in which we want this View Object to appear.
Click on the Updatable access through entity objects radio button. Click Next.
Select the Entity Object corresponding to the view and move it to the selected area.
Move the View Object to the selected area.
In the Application Module page select the Check Box for Application Module & give the package name.
This will create the AppModule and include the view object into the Application Module.
If we do not create Application Module here then we can create by Right clicking on the Model folder in Application Navigator and select New.
Click on ADF Business Components and select Application Module.
And we can include the View Objects into Application Module from Data Model tab in AppModule.xml page.
Click on finish.
This will generate a View Object.
4.) Creating UI
Now we are going to create the UI.
Right click on ViewController in Application Navigator select JSF in Categories & select JSF page.
Give the name of the page, we can select the templates as required.
Click OK, this will generate a jspx page as below
Drag & drop a Panel Collection from Component Palette on the page.
Now we are going to create a table on which we are going to do the CRUD operations. We will operate on the View Object which in turn operates on entity object.
Click on the Data Controls tab in the Application Navigator drag the View object which we included in the Application Module to the page inside panel collection. Select table->Read only table. If we select ADF table… then the table appearing in the main page will be updatable, but we want the table in the main page to be read only and the modification & insert to happen only through popups.
Select row selection and sorting check box in the edit table columns & click ok.
Drag a toolbar from component palette on the toolbar facet. In this toolbar we will add various buttons to perform desired operations.
Drag and drop a button from component palette on the toolbar and change the id to cbInsert and Text to Insert.
Drag Show Popup Behavior from Component Palette->Operations into Insert button.
Do the same step for edit button with default id and Text as Edit.
Now we need to add Delete, Save and Undo buttons.
But before that we need to include commit, delete & Rollback in the bindings, so that we will access them in the Action Listener for these buttons.
Open mainPagePageDef.xml present inside View Controller->Application Source-> com.view.pageDefs package.
Click on the “+” sign for Bindings.
Select action & click OK.
Select AppModuleDataControl & from the Operations select Commit & press OK.
This will add Commit in the bindings.
We need to do the same steps for Rollback.
The Bindings will look like this:
We have added Commit and Rollback for Save and Undo button. We need to add a binding for Delete button but Delete is not available in the AppModuleDataControl.
So we will add Delete Binding from the View Iterator.
Click on the “+” sign for Bindings click action.
In the select an Iterator drop down, select the Iterator for our View Object.
From the Operation drop down select Delete and press OK.
Now add a button next to Edit and name it Delete.
From the property tab for Delete button select ActionListener and click Method Expression Builder. And in the Expression area write #{bindings.Delete.execute}
Add a button next to Delete and name it “Save”.
In the Action Listener write #{bindings.Commit.execute}
Add a button next to Delete and name it “Undo”.
In the Action Listener write #{bindings.Rollback.execute}
Select Partial Submit and Immediate to ”true” in the property Inspector for Undo button.
Now we need to add Partial Triggers on the table for Save and Undo button.
Select the table from Structure tab and go to Property Inspector tab.
Select Display Row drop down to selected. And from the Partial Trigger drop down select Edit.
Move cb3 & cb4 to the selected area and press OK.
Now we will create a Managed bean class for the popup.
Right click on View Controller select New->Java->Java Class.
Give the name of the class and the package name.
This will generate a class with a default constructor.
We will create one binding for Insert operation first.
Go to mainPagePageDef.xml present inside View Controller->Application Source-> com.view.pageDefs package.
Click on the “+” sign for Bindings. Click on action then in create binding page for select an Iterator drop down select the view Iterator. In operation drop down select Create Insert operation. & press OK.
We will create two listeners - PopupFetchListener and PopupCanceledListener:
First one is invoked during popup opening and is used to trigger Insert mode when it is needed. And second is triggered when user wants to dismiss editing dialog. Editing dialog is based on DialogListener, where Commit or Rollback operations are called:
The main trick with af:popup component usage is on Insert. The problem is, when you define af:showPopupBehavior, framework will not execute Action or ActionListener defined for the same button. So, I'm calling CreateInsert operation from PopupFetchListener, during that moment when popup is rendering. This allows to make it work for Inserts through af:popup component. Additionally, I'm doing a check there and invoking CreateInsert operation only when Insert button was pressed and not when Edit
DialogListener invokes Commit or Rollback operations based on user action:
PopupCanceledListener is extremelly helpful and is triggered when user is closing dialog with (X) or Escape keyboard button:
Now we will add the popup.
Select popup from Component palette and drag it below panel collection.
We will create a form for Insert and Edit operation.
Select dialog from Component palette and drag it inside popup.
Now select BikeCompaniesVO1 from Data Controls and drag it inside the dialog.
Select form->ADF form…
On the Edit Form Details page click OK as we don’t want to include any navigational controls or submit button.
The popup will look like this.
Now we will add PopupFetchListener and PopupCancelListener which we have defined in the Managed Bean class to the popup.
Go to the Property Inspector tab for Popup.
Set the content delivery as lazyUncached.
Select the PopupFetchListener and click on Edit.
Click on New .
Enter the details of the class which we have created in Managed Bean.
Select the Method as editPopupFetchListener and click OK.
Do the same steps for PopupCanceledListener and select method as editPopupCancelListener.
Now we need to add the Listener to the Edit button.
Go to the Property Inspector tab of Dialog Box which we have added inside popup.
Set Type as okCancel and Resize On.
Click on the DialogListener and click on Edit.
Include the Method editDialogListener & press OK.
when we want to reflect changes done in editable Popup window back to main read-only table. In order to keep main table in synch, we need to set PartialTriggers dependency for Panel Collection from Popup and Popup Dialog components. We need to set it from both, because:
Popup Dialog component triggers partial refresh on OK event (when we save data)
Popup component triggers partial refresh on Popup Cancel event and on Popup fetch event (we can see newly inserted row)
Same logic works in case of custom reusable toolbar component, consuming page can reference Popup and Popup Dialog directly from custom tag library.
Let's set PartialTriggers property for Panel Collection:
Go to the Property Inspector tab of Panel Collection. Click on PartialTriggers->Edit.
Move Popup and dialog to the selected area and press OK.
Now we will include the popup to Insert and Edit button.
Go to the properties Inspector of the Show PopUp Behavior for Insert button.
Click on Edit for PopupId.
Select the popup and press OK.
Do the same for Edit button.
Here we have completed out Project.
Now run the Project, we will get the below Screen:


