In this post i will explain to deploy a secured ADF Application on weblogic server.
Here one thing to note is that i am using Jdeveloper11.1.1.4 so our task has become very easy.
till Jdeveloper11.1.1.2 we needed to migrate ADF security policies manually to weblogic server, but from Jdeveloper11.1.1.3 the policies gets migrated to weblogic server at the time of deployment.
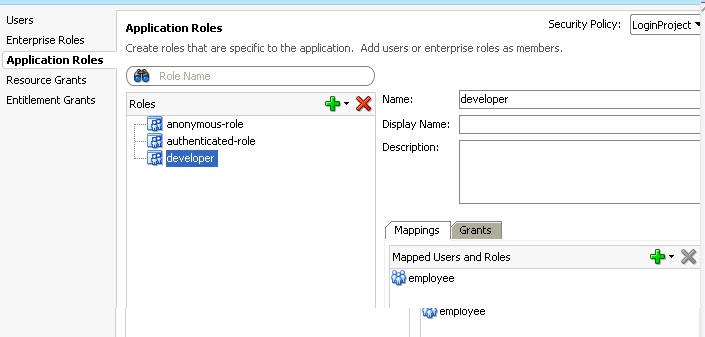
I have created a simple login page and enabled ADF security.
I have created a user as ADF/adfcoder1
an Application role as developer
an an Enterprise role as employee
and associated the user and application role to the enterprise role we created as shown in the below screenshots:


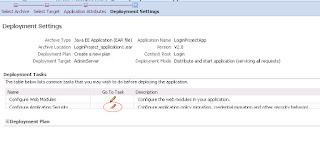
Now we will deploy this application as an .ear file to the weblogic server.
Go to Applicatio -> Application Properties -> Deployment

make sure that the check box Auto Generate and Synchronize weblogic-jdbc.xml Descriptors during Deloyment is unchecked. And next three checkbox are selected.
Now go to Application -> Deploy -> LoginProject_application1(name of your application)

 This will generate an EAR file in the back end folder structure inside deploy folder of the Application as shown below:

We will deploy this ear file in weblogic server through em console. we can also use Admin console to deploy applications.
click on Weblogic_Domain dropdown of your domain and go to Application Deployment -> Deploy

browse to the ear file which is present in deploy folder of your project.

click Next.
select the target server in which you want to deploy your application.

click Next.
set the Appplication Name and Context Root as per your convenience. Context Root will appear in the URL of the deployed project.

Now click next and click on "Configure Application Security"
select Append for both Application polict migration and Application credential migration.

click on Apply and then Deploy.

Here we have deployed the application on the weblogic server.
But we need to create user in the Application server.
go to Admin console: http://localhost:7001/console
Then go to Security Realms which is present in Domain Structure and click on myrealm.
click on Users And Groups tab and then Groups.

create a new group and give it the same name as the Enterprise role of your application.
In my case it is employee.

now go to users tab and create a user and give it the same name as there in ADF application.
in my case it is ADF.
Now click on the user you have just created and go to Groups for that user and shuttle the group associated with this user(employee) to the right side as shown in the below screenshot:

click on save.
So we have created a user and associated this user to a group which is same as a user and Enterprise role of our project.
Now go back of the em console. click on the application you have just deployed.
click on the Application Deployment dropdown and go to Security -> Application Role

double click on the Role name green button. this will list the Application role and Enterprise role of your project.

we will add the user we created in Admin console of weblogic server to this application.
click on the role name, then click on Add user. select the user we created in Admin console and move it to the selected area. click ok.

Now we are ready to run the application.
click on the application present in Application deployments. click on the test point link present inside Entry points-> web module.
A new window will open, in the url append /faces/(name of the page of your application)
In my case it is:
http://localhost:7001/Login/faces/LoginPage.jspx
enter the credentials, Login will be successful and it will lead you to the next page.
Here one thing to note is that i am using Jdeveloper11.1.1.4 so our task has become very easy.
till Jdeveloper11.1.1.2 we needed to migrate ADF security policies manually to weblogic server, but from Jdeveloper11.1.1.3 the policies gets migrated to weblogic server at the time of deployment.
I have created a simple login page and enabled ADF security.
I have created a user as ADF/adfcoder1
an Application role as developer
an an Enterprise role as employee
and associated the user and application role to the enterprise role we created as shown in the below screenshots:


Now we will deploy this application as an .ear file to the weblogic server.
Go to Applicatio -> Application Properties -> Deployment

make sure that the check box Auto Generate and Synchronize weblogic-jdbc.xml Descriptors during Deloyment is unchecked. And next three checkbox are selected.
Now go to Application -> Deploy -> LoginProject_application1(name of your application)


We will deploy this ear file in weblogic server through em console. we can also use Admin console to deploy applications.
click on Weblogic_Domain dropdown of your domain and go to Application Deployment -> Deploy

browse to the ear file which is present in deploy folder of your project.

click Next.
select the target server in which you want to deploy your application.

click Next.
set the Appplication Name and Context Root as per your convenience. Context Root will appear in the URL of the deployed project.

Now click next and click on "Configure Application Security"

select Append for both Application polict migration and Application credential migration.

click on Apply and then Deploy.

Here we have deployed the application on the weblogic server.
But we need to create user in the Application server.
go to Admin console: http://localhost:7001/console
Then go to Security Realms which is present in Domain Structure and click on myrealm.
click on Users And Groups tab and then Groups.

create a new group and give it the same name as the Enterprise role of your application.
In my case it is employee.

now go to users tab and create a user and give it the same name as there in ADF application.
in my case it is ADF.
Now click on the user you have just created and go to Groups for that user and shuttle the group associated with this user(employee) to the right side as shown in the below screenshot:

click on save.
So we have created a user and associated this user to a group which is same as a user and Enterprise role of our project.
Now go back of the em console. click on the application you have just deployed.
click on the Application Deployment dropdown and go to Security -> Application Role

double click on the Role name green button. this will list the Application role and Enterprise role of your project.

we will add the user we created in Admin console of weblogic server to this application.
click on the role name, then click on Add user. select the user we created in Admin console and move it to the selected area. click ok.

Now we are ready to run the application.
click on the application present in Application deployments. click on the test point link present inside Entry points-> web module.
A new window will open, in the url append /faces/(name of the page of your application)
In my case it is:
http://localhost:7001/Login/faces/LoginPage.jspx
enter the credentials, Login will be successful and it will lead you to the next page.


