Tuesday, February 26, 2013

Delete Messages from JMS Queue in weblogic using WLST


Set classpaths required for WLST from MW_HOME/wlserver_10.3/server/bin/
. ./setWLSEnv.sh
start WLST by typing
java weblogic.WLST

connect('weblogic', 'welcome1', 't3://localhost:7001')
serverRuntime()

cd('/JMSRuntime/<TargetServerName>.jms/JMSServers/<JMSServerName>/Destinations/<JMSModuleName>!<QueueName>')

{ex.- wls:/fmw_domain/serverRuntime>cd('/JMSRuntime/AdminServer.jms/JMSServers/JMSServer1/Destinations/SystemModule1!Queue1')
}

cmo.deleteMessages('')
{This command delete all messaged in queue and will return the number of messages deleted.}

If you want to delete a particular message from the queue, use below command:

cmo.deleteMessages("JMSMessageID IN('ID:<126965.1361894150054.0>')")
Results will be:
1
It will delete a message having id ID:<126965.1361894150054.0>
here is the message ID which we can get from "summary of JMS Message" from Admin Console.

Monday, January 16, 2012

How to deploy DVM using JAVA Code:


Generally we migrate DVM’s from one env. to other env. using ESB console. But when there is a lot of DVM’s it becomes difficult and time taking process to migrate using ESB console.
We can use Java code to migrate all the DVM’s to a server at a time.

Set JAVA HOME and CLASSPATH
export CLASSPATH=$ORACLE_HOME/integration/esb/lib/commons-logging.jar:
$ORACLE_HOME/integration/esb/lib/commons-codec-1.3.jar:
$ AIAHOME/Infrastructure/install/lib/commons-httpclient-3.1.jar
 
export JAVA_HOME=$ORACLE_HOME/jdk
or we can keep these jar files in a folder and set CLASSPATH according to that.
commons-httpclient-3.1.jar- this jar file comes with AIA installation, if only SOA is installed we need to download this jar.

2.)Place all the DVM files to be migrated inside home/Migration/DVM/

3.)Create ImportDVM.properties file inside /home/ Migration  which contains the connection details of the server.
hostname=<host name of the server>
port=<port no of the server>
username=oc4jadmin
password=welcome1
dvm=home/Migration/DVM/DVM1.xml, home/Migration/DVM/DVM2.xml, home/Migration/DVM/DVM3.xml, home/Migration/DVM/DVM4.xml

4.)create ImportDVM.java file inside /home/ Migration
import java.io.ByteArrayOutputStream;
import java.io.File;
import java.io.InputStream;
import java.util.Properties;
import java.util.StringTokenizer;
import org.apache.commons.httpclient.HttpClient;
import org.apache.commons.httpclient.methods.GetMethod;
import org.apache.commons.httpclient.methods.PostMethod;
import org.apache.commons.httpclient.methods.multipart.FilePart;
import org.apache.commons.httpclient.methods.multipart.MultipartRequestEntity;
import org.apache.commons.httpclient.methods.multipart.Part;
import org.apache.commons.httpclient.methods.multipart.StringPart;

public class ImportDVM {
public static void main(String[] args) {
Properties props = new Properties();
try {
InputStream in = Class.forName("ImportDVM").getResourceAsStream("ImportDVM.properties"); // Properties file to define your dynamic parameters
props.load(in);
String esbHost = props.getProperty("hostname");
int esbPort = Integer.parseInt(props.getProperty("port"));
String username = props.getProperty("username");
String password = props.getProperty("password");
String fileLocation = props.getProperty("dvm"); //dvm file location
StringTokenizer st = new StringTokenizer(fileLocation, ",");
while (st.hasMoreTokens()) {
String dvm = st.nextToken();
importDVM(esbHost, esbPort, username, password, dvm);
}
} catch (Exception ex) {
ex.printStackTrace();
}
}
public static void importDVM(String esbHost, int esbPort, String username, String password, String fileLocation) {
try {
InputStream is = null;
HttpClient client = new HttpClient();
int responseCode = 0;
client.getHttpConnectionManager().getParams().setConnectionTimeout(90000);

// Authenticate
String authUrl = "http://"+esbHost+":"+esbPort+"/esb/j_security_check?j_username="+username+"&j_password="+password;
GetMethod auth = new GetMethod(authUrl);
responseCode = client.executeMethod(auth);

// ImportDVM
File targetFile = new File(fileLocation);
PostMethod post = new PostMethod("http://"+esbHost+":"+esbPort+"/esb/esbConfiguration/executeCommand?action=ImportDVM");
post.setRequestHeader("User-Agent", "ESB Client/1.0");
//StringPart s1 = new StringPart("importType","map");
//StringPart s2 = new StringPart("importMode","overwrite");
//FilePart f1 = new FilePart(targetFile.getName(), targetFile);
Part[] parts = {new StringPart("importType","map"), new StringPart("importMode","overwrite"), new FilePart(targetFile.getName(), targetFile)};
System.out.println(Part.getLengthOfParts(parts));
post.setRequestEntity(new MultipartRequestEntity(parts, post.getParams()));
responseCode = client.executeMethod(post);
System.out.println("Response code: " + responseCode);
is = post.getResponseBodyAsStream();
ByteArrayOutputStream baos = new ByteArrayOutputStream();
int c;
while ((c = is.read()) != -1) {
baos.write((char)c);
}
byte[] responseBody = baos.toByteArray();
post.releaseConnection();
String response = new String(responseBody);
System.out.println(response);
} catch (Exception e) {
e.printStackTrace();
}
}
}

compile the java file as:
javac ImportDVM.java


run ImportDVM.java
java ImportDVM

Deploying BPEL using ANT Script


In this blog we will assume that we have already changed the url's of the BPEL process to the corresponding url of the server to which we are going to migrate.
Set devprompt.sh
cd <SOA_HOME>/bpel/bin/
sh devprompt.sh

Set env. variables
. setsoaenv.sh
export OC4J_USERNAME=<username>
export OC4J_PASSWORD=<password>

go to the  process which needs to be migrated
cd /home/stage/Migration/
cd bpelProcess/

run Ant script:
ant -f build.xml -Dadmin.password=<password>

Wednesday, December 28, 2011

some syntax to create user in Oracle Database


***********************************************************************************************************************
--To find the default tablespace in DB:
SELECT PROPERTY_VALUE FROM DATABASE_PROPERTIES
WHERE PROPERTY_NAME = 'DEFAULT_PERMANENT_TABLESPACE';
-- this gives the output "USERS" in my case

--create user: here i am using user name "sdb" password "password"
CREATE USER sdb IDENTIFIED BY password
DEFAULT TABLESPACE USERS       
TEMPORARY TABLESPACE temp ;     

--Default object tablespace
-- Assign space for table and index segments
--If a user creates an object (such as a table or an index) without explicitely specifying the tablespace in which it goes, Oracle will place the object in the default object tablespace.
--Default temporary tablespace
-- Assign sort space
--If a user needs a temporary segment for an operation (such as a sort), Oracle will place the data in his default temporary tablespace.

--to give the user some space quota on its tablespaces:
ALTER USER sdb QUOTA UNLIMITED ON Users;

--grant CREATE SESSION privilege necessary to login, this is the right to connect to the database
GRANT CONNECT, RESOURCE TO sdb;
-- Make user a DB Administrator
GRANT DBA TO sdb;

-- lock a user account
ALTER USER sdb ACCOUNT LOCK   
-- unlocks a locked users account
ALTER USER sdb ACCOUNT UNLOCK;

-- Force user to choose a new password
ALTER USER sdb PASSWORD EXPIRE; 
-- choose new password
ALTER USER sdb IDENTIFIED BY password1

-- Remove user
DROP USER sdb CASCADE;

***********************************************************************************************************************

some concepts:
Users in Oracle                 
In Oracle terminology, a user is someone who can connect to a database (if granted enough privileges) and optionally (again, if granted the appropriate privileges) can own objects (such as tables) in the database.
The objects a user owns are collectively called >schema. A schema, on its part, is always bound to exactly one user. Because there is obviously a 1 to 1 relationship between a user and a schema, these two terms are often used interchangeable.
In order to find out what users are created on the database, one can use dba_users

A user's schema consists of all objects that belong to this user.

Oracle database objects                              
Oracle distinguishes between the following «object»:
    Tables
    Views
    Indexes
    Clusters
    Synonyms
    Sequences
    Procedures
    Functions
    Packages
    Triggers
    ...

All objects that belong to the same user are said to be this user's schema.

***********************************************************************************************************************

find commands in Linux


Find  a Word for a particular word in files present in multiple subdirectories
find . -type f -exec grep "dvc88601" {} \; -print

find ./ -type f -exec grep -i -H 'aaa' {} \;

if there is a escape character like “-” then use “\” for example for finding “–aaa”
find ./* -exec grep -i -H '\-aaa' {} \;

finding the occurrence in a particular format of a file: for example here we are finding it only in “.txt” files
find ./ -iname \*.txt\* -exec grep -i -H 'bbb' {} \;

Find and Replace:
this is meeting the requirement for me :
$ perl -e "s/pepsi/coke/g;" -pi $(find /home/oracle/vishal/test -type f)
syntax:
$ perl -e "s/FIND/REPLACE/g;" -pi $(find path/to/DIRECTORY -type f)

Ex:
findreplaceExurl.sh
perl -e "s/Vivek/vishal/g;" -pi $(find /home/oracle/vishal/test -type f)
perl -e "s/Pratheep/vishal/g;" -pi $(find /home/oracle/vishal/test -type f)
perl -e "s/Prateek/vishal/g;" -pi $(find /home/oracle/vishal/test -type f)
perl -e "s/Tom/vishal/g;" -pi $(find /home/oracle/vishal/test -type f)
perl -e "s/Jimmy/vishal/g;" -pi $(find /home/oracle/vishal/test -type f)
perl -e "s/Ramanujam/vishal/g;" -pi $(find /home/oracle/vishal/test -type f)
perl -e "s/Naveen/vishal/g;" -pi $(find /home/oracle/vishal/test -type f)
perl -e "s/Jophy/vishal/g;" -pi $(find /home/oracle/vishal/test -type f)
perl -e "s/Krishna/vishal/g;" -pi $(find /home/oracle/vishal/test -type f)


Find and Replace:
find ./ -type f -exec sed -i ’s/string1/string2/’ {} \;

Find and Delete:
find ./* -type f -exec sed -i 's/index.html//g' {} \;

Find a file
========
The Linux 'find' command will list files and directories that match the arguments to the command and pass specified tests. For example, to find all 'txt' files in the home directory, the following command can be used:

find ~ -name *.txt

The '~' means start at the user's home directory and the -name is a test which means list only files with that particular name. Find has many tests but some of the most useful for finding files that have been updated recently are the -mtime and -mmin tests.


Find All Files Modified in the Last 90 Minutes
==================================

find . -mmin -90

It looks as if the 'find' command has listed files and directories. If we only want to see the files, add the -type test to the command to specify files only.

find . -type f -mmin -90

The sample output would then become

       
                /home/linux/dns/mysql-outfile/dnsx.txt
                /home/linux/dns/mysql-outfile/dnsx.doc
       
      
Adding Xargs to Find
=============================
Xargs' power lies in the fact that it can take the output of one command, in this case find, and use that output as arguments to another command. So, using the basic find command above, let us pass the output of find to xargs and get xargs to issue multiple 'ls -l' commands.

find ~ -type f -mmin -90 | xargs ls -l

The sample output would then become

       
                -rw-rw-r--    1 linux    lunux    10209032 Jun 30 13:28 /home/linux/dns/mysql-outfile/dnsx.doc
                -rw-rw-rw-    1 mysql    mysql    10209032 Jun 30 12:53 /home/linux/dns/mysql-outfile/dnsx.txt
       
      
Find All Files Modified More Than 5 Years Ago
=====================================
In this example of the find and xargs command, we will use a positive time and the mtime test. The operand value to mtime is the number of 24 hour periods. It is not the number of days and the reason why will become apparent if you read 'man find'. So, to see files over 5 years old will will use +1825 as the value for mtime. We have ignored leap years in calculating 5 years as 5*365 days. The command issued is

find ~ -type f -mtime +1825 |xargs ls -l

Tell xargs when to Quit
==================
One problem with the above approach is that a complete listing of the current directory will occur if the find command does not find any files! Xargs sees a list of zero files, but still issues the 'ls -l' command. To overcome this, simply use the xargs option '-r' which means "If the standard input does not contain any nonblanks, do not run the command." So, our command now becomes:

find ~ -type f -mtime +1825 |xargs -r ls -l

Note that the '-r' is an xargs option and therefore comes after the xargs command name but before the command to be issued - in this case 'ls -l'.

Friday, July 1, 2011

Error message in ESB Console and nothing appears in Tracking tab

Sometimes we face very strange issue in ESB console. Nothing appears in the tracking tab of the ESB Console and the error message comes as:

Unable to build the instance relationship, as the required metadata is not available.

First check the size of the log files. sometimes if the log size is very large then the server doesnt behave as expected.
go to  <oracleHome>/opmn/logs/
type ls -lh to find the size of the log files.
If the size of the log file is very big then we need to empty the file.
first stop the server (go to /opmn/bin/  then type ./opmnctl shutdown)
take the backup of the log file.
cp SOA_GROUP~oc4j_soa~SOA_GROUP~1.log backup_SOA_GROUP~oc4j_soa~SOA_GROUP~1.log
empty the log file.
cp /dev/null SOA_GROUP~oc4j_soa~SOA_GROUP~1.log

Then start the server (go to /opmn/bin/  then type ./opmnctl startall)

This is how my issue got resolved. Not sure if reducing the size realy helped or bouncing the server.
If anyone has a bettor solution then please share.

Configuring Database Adaptor

Configuring Database Adaptor in Application server

Creating Connection Pool


Login to em console ->cluster toplogy->oc4j_soa->Administration->JDBC Resources
connection pools->
create Name - filedbconn
Connection Factory Class oracle.jdbc.pool.OracleDataSource
URL : jdbc:oracle:thin:@//localhost:1521/xe
Username : system
Password : oracle

Creating Datasource connections

login in to em console ->cluster toplogy->oc4j_soa->Administration->JDBC Resources
Datasources->create ->select Manage Datasource -> continue

Application Name : default
JNDI Location : jdbc/localdbtest
Type : Manage Datasource
Connection Pool : filedbconn(select existing connection pool name)
Transaction Level : Global & Local Transactions
Name : LocalDBDatasource

Configuring Database Adaptor

go to em console ->cluster toplogy->oc4j_soa->Applications->default ->DBAdaptor
Connection Factory Interface - javax.resource.cci.ConnectionFactory
JNDI Location - eis/apps/LocalDatabase
xADataSourceName - jdbc/localdbtest (is the name of JNDI Location in Datasource)

Wednesday, June 22, 2011

Erroor : "Could not create the Java virtual machine" in Jdeveloper 11g

While starting Integrated Weblogic Server of Jdeveloper 11g sometimes we get Error message as:

Could not reserve enough space for object heapCould not create the Java virtual machine.

To solve this issue we need to add one environment varible.

Right click on My Computer, go to properties->Advanced->Environment Variables.
In user Variables add a New variables with below details:
Variable name: EXTRA_JAVA_PROPERTIES
Variable Valute: -Xms256m -Xmx256m

Now try starting the Integrated weblogic server.
In my case it worked fine after addig Environment variable.

Monday, April 18, 2011

Steps to deploy ADF 11g Application with ADF security enabled on weblogic server

In this post i will explain to deploy a secured ADF Application on weblogic server.
Here one thing to note is that i am using Jdeveloper11.1.1.4 so our task has become very easy.
till Jdeveloper11.1.1.2 we needed to migrate ADF security policies manually to weblogic server, but from Jdeveloper11.1.1.3 the policies gets migrated to weblogic server at the time of deployment.

I have created a simple login page and enabled ADF security.
I have created a user as ADF/adfcoder1
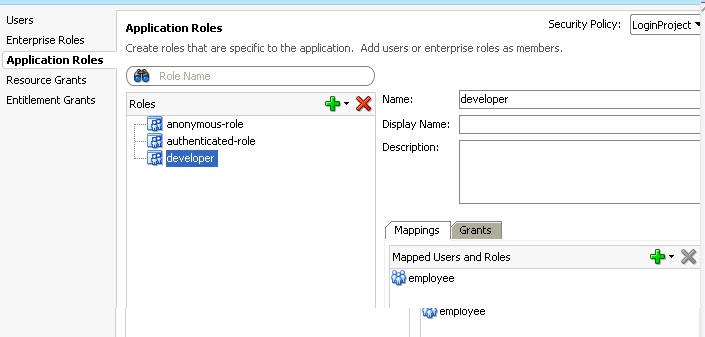
an Application role as developer
an an Enterprise role as employee
and associated the user and application role to the enterprise role we created as shown in the below screenshots:


Now we will deploy this application as an .ear file to the weblogic server.
Go to Applicatio -> Application Properties -> Deployment

make sure that the check box Auto Generate and Synchronize weblogic-jdbc.xml Descriptors during Deloyment is unchecked. And next three checkbox are selected.

Now go to Application -> Deploy -> LoginProject_application1(name of your application)

This will generate an EAR file in the back end folder structure inside deploy folder of the Application as shown below:


We will deploy this ear file in weblogic server through em console. we can also use Admin console to deploy applications.

click on Weblogic_Domain dropdown of your domain and go to Application Deployment -> Deploy

browse to the ear file which is present in deploy folder of your project.

click Next.
select the target server in which you want to deploy your application.

click Next.
set the Appplication Name and Context Root as per your convenience. Context Root will appear in the URL of the deployed project.


Now click next and click on "Configure Application Security"

select Append for both Application polict migration and Application credential migration.

click on Apply and then Deploy.

Here we have deployed the application on the weblogic server.

But we need to create user in the Application server.
go to Admin console: http://localhost:7001/console
Then go to Security Realms which is present in Domain Structure and click on myrealm.
click on Users And Groups tab and then Groups.


create a new group and give it the same name as the Enterprise role of your application.
In my case it is employee.


now go to users tab and create a user and give it the same name as there in ADF application.
in my case it is ADF.
Now click on the user you have just created and go to Groups for that user and shuttle the group associated with this user(employee) to the right side as shown in the below screenshot:


click on save.
So we have created a user and associated this user to a group which is same as a user and Enterprise role of our project.
Now go back of the em console. click on the application you have just deployed.
click on the Application Deployment dropdown and go to Security -> Application Role

double click on the Role name green button. this will list the Application role and Enterprise role of your project.


we will add the user we created in Admin console of weblogic server to this application.
click on the role name, then click on Add user. select the user we created in Admin console and move it to the selected area. click ok.


Now we are ready to run the application.
click on the application present in Application deployments. click on the test point link present inside Entry points-> web module.
A new window will open, in the url append /faces/(name of the page of your application)
In my case it is:
http://localhost:7001/Login/faces/LoginPage.jspx
enter the credentials, Login will be successful and it will lead you to the next page.